

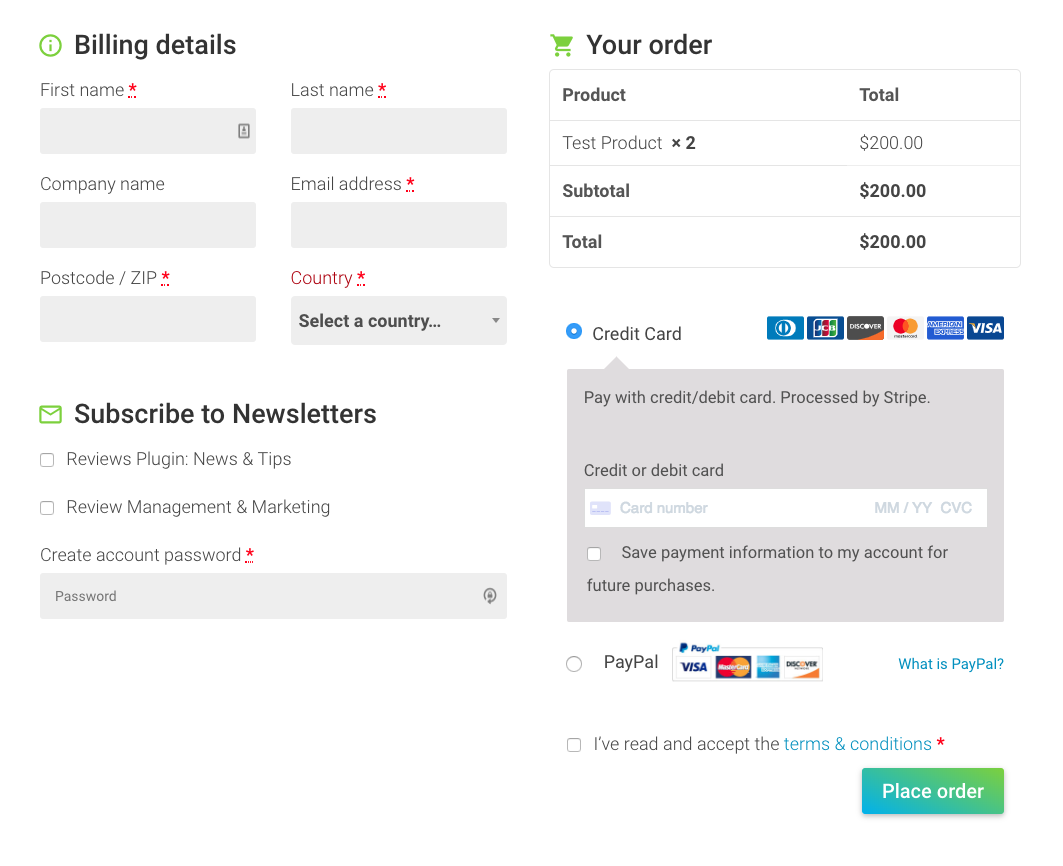
When building Starfish Reviews plugin, we initially started with a WooCommerce-based solution for selling and licensing the plugin. I really didn’t like WooCommerce’s over-complicated checkout page. I wanted something simpler and more straightforward. So here’s how I got from complicated, to simple with some nice icons to help visually. While I did it with the Divi theme, most of this should work for any theme. Here is the end result:
Changing the Checkout Fields
Add-on WooCommerce MailPoet 3
I wanted to help people signup for our email updates and newsletter as part of purchasing the plugin, so they could get info about new versions and such. So I installed and configured this plugin. It’s fairly straightforward. Just select the lists you want to offer and a few things and it’ll inject the signup checkbox(es) into the checkout form. You may want to use a different plugin based on the newsletter solution you’re using.
Woo Checkout Field Editor Pro
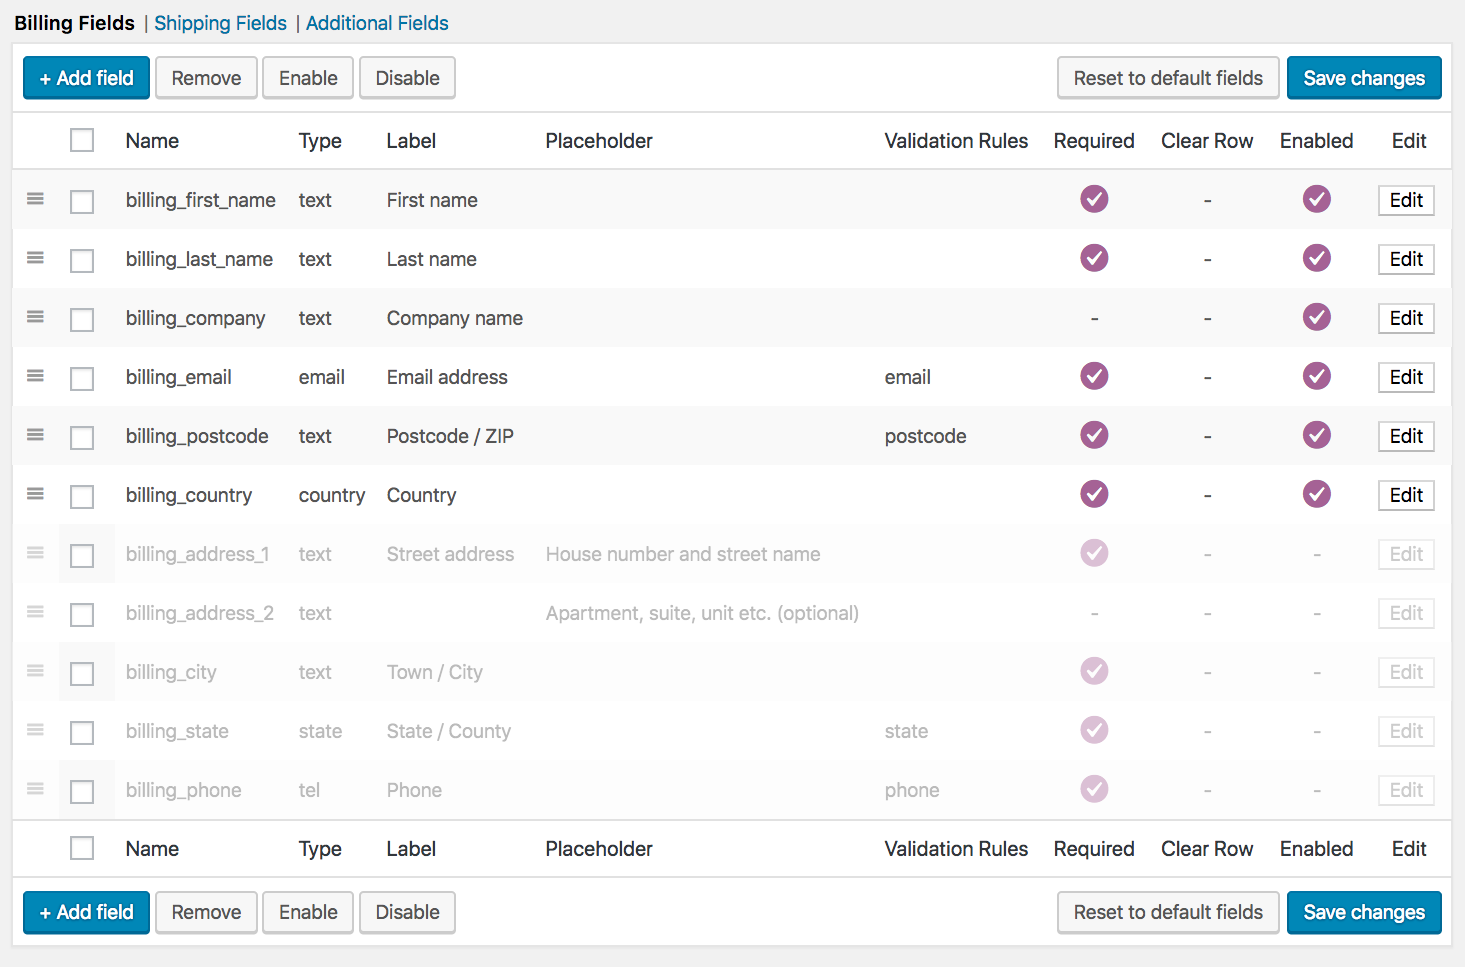
For a digital product, it’s not necessary to capture address, phone number, etc, etc. So I used this plugin to simplify the checkout fields that are available. I used it to turn off the Shipping Fields entirely, as well as the one additional field. Then I turned off the Billing address fields, the city, state, and phone number. So it looks like this:
For the remaining fields, I clicked the “Edit” button and added “form-row-first” or “form-row-last” classes to each field, so they would be 2-column, instead of one. Disabling fields and making the remaining ones 2-column, significantly shortens the billing section. So even after adding in the newsletter checkboxes and password field, this column ends up being shorter than the right column with the cart and payment info.
Making the Whole Page Look Great with CSS
Here’s the CSS I used. I just loaded this in Divi’s “Custom CSS” field under the Page Settings. That way it only loads on the checkout page. I’ve put comments to explain what each section does, that follows the comment. So you can hopefully modify it to fit your needs. One note is that we were already using the Divi Icon King plugin to load Google’s Material icons elsewhere on the site. So you’ll see several references to that font family and then things like “content: ‘\E88F’;” to display the icon from the font. If you’re using Font Awesome or Divi’s built-in font, you’ll need to adjust those accordingly.
/* Add Icons to Headers & Notifications */
.woocommerce-billing-fields h3:before, h3#order_review_heading:before, h3#phoen_order_review_heading:before {
 font-family: "Material Icons";
 font-size: 27px;
 content: '\E88F'; /* sets default icon to a circled "i" */
 color: #7ed026;
 padding-right: 10px;
 vertical-align: bottom;
}

h3#order_review_heading:before { content: '\E8CC'; } /* changes the icon set above to a shopping cart for the order */

/* MailPoet Subscribe Fixes */
 .mailpoet-subscription-section {xzz
  padding-top: 50px;
 }
 .mailpoet-subscription-section h3:before { content: '\E0E1'; }

/* Fancy Subscribe Now Btn */
#place_order {
  background-image: linear-gradient(25deg,#00aeef 0%,#7ed026 100%)!important;
  border: transparent;
  color: #fff;
  box-shadow: rgba(0, 0, 0, 0.28) 0px 2px 8px 0px;
}

#place_order:hover { background-image: linear-gradient(25deg,#7ed026 0%,#00aeef 100%)!important; }

/* 2 column layout */
@media (min-width: 981px) {
  .woocommerce-checkout .woocommerce { overflow: hidden;}
  .woocommerce-checkout .woocommerce:after { clear: both; }
  .woocommerce-checkout .woocommerce .col2-set .col-1, .woocommerce-checkout .col2-set .col-1 { width: 100%; }
  .woocommerce-checkout .woocommerce .col2-set .col-2, .woocommerce-checkout
 .woocommerce-page .col2-set .col-2 { display: none; }
 .woocommerce-checkout .woocommerce .col2-set, .woocommerce-checkout .woocommerce-page .col2-set { float:left; width: 48%; }
  .woocommerce-checkout #order_review_heading, .woocommerce-checkout .woocommerce #order_review, .woocommerce-checkout .woocommerce-page #order_review {
    float: left;
    width:48%;
    margin-left: 4%;
  }
}

/* Rounded corners on the WooCommerce "alert" messages */
.woocommerce-error, .woocommerce-info, .woocommerce-message { border-radius: 3px; }

/* Style form fields to look like Divi */
input.text, input.title, input[type=email], input[type=password], input[type=tel], input[type=text], select, textarea {
  border: none;
  background-color: #eee;
}
.select2-container .select2-selection--single { height: 49px; }
.select2-container--default .select2-selection--single .select2-selection__rendered {
  line-height: 49px;
  color: #4e4e4e;
  font-weight: bold;
}
.select2-container--default .select2-selection--single .select2-selection__arrow b { margin-top: 8px; }
.select2-container--default .select2-selection--single {
  background-color: #eee;
  border: none;
}

/* some tweaks to simplify the payment method area */
.woocommerce-checkout #payment { background: none!important; }
.woocommerce-checkout #payment ul.payment_methods { border: none; }
Bonus: Skip the Cart Page
If you really want to simplify things, and especially if you only have 1 product, like we did, you can use the following code snippet to take people directly to the Checkout page. Add it to a child theme’s functions.php, or to a custom plugin, or (my favorite) use the excellent Code Snippets plugin. With Code Snippets plugin, you can select the “Only run on site front-end” option so this code isn’t being run in the admin, when it has no impact there.
add_filter(‘woocommerce_add_to_cart_redirect’, ‘gh_add_to_cart_redirect’);
 function gh_add_to_cart_redirect() {
 global $woocommerce;
 $checkout_url = wc_get_checkout_url();
 return $checkout_url;
}
In the end, all these cool hacks make for a way nicer WooCommerce checkout page, with everything fitting nicely into 2-columns (on desktop) and the billing section being much shorter. Let me know if you found this helpful, or how you adapted it to your theme or design, in the comments!
If you liked this, you might like my guide to creating a cleaner nicer WooCommerce My Account navigation.
Need Some Help?
Is this too technical? Or maybe you’re just too busy? Sign up for our WordPress management plan or higher, and we’ll do enhancements like this for you.


Hey, Tevya. I’ve tried quite a few different code pieces to do something similar to this, but none of them worked as beautifully as yours did. However, though it made the checkout page so much better, for some reason, it made it impossible to scroll on the actual product pages. Weird! Any idea what could be causing that? I didn’t see anything int he code that seems like it would make that an issue.
So glad it worked beautifully for you, Will!
I had it setup so it would only load the CSS on the checkout page. So I don’t know how it might have affected product pages. Did you use the plugins I recommended? If so, could you try removing the CSS And make sure it’s just a CSS problem, and not a plugin conflict?
Once you’ve tried that, my guess would be something in the “2 column layout” section? Maybe something about that is impacting products as well, since it’s not specific to the checkout page. One way to test quickly would be to check on mobile (or narrow your browser window), since that part only applies to resolutions 980px or wider. If the products work fine at narrower widths, then that’s most likely the issue.
If it is that section, you could make those styles more specific by including a reference to the checkout page such as “body.woocommerce-checkout” (I think that’s inserted by WooCommmerce) at the beginning of each style there.
I’m using Divi, so I was able to resolve the issue by adding the CSS to the custom CSS section just on the checkout page. That way it doesn’t even load anywhere else. Thanks for getting back with me though.
Awesome! That’s just how I had it setup. I’ll try to update the CSS to work more generally next time I have a chance to work with it.
No problem. It could just be a conflict with another plugin I have running or something else. No big deal. I literally have tried dozens of options to get what I’m looking for, and your solution is the only thing that worked well and looked great. I really appreciate you making it available!
Thanks a lot for your post ! And thanks for your previous comments (I had the same issue).
If we skip the cart page, is it possible to have the possibility to change the quantity on checkout? What do you think?
Thanks for your kind words Samuel. Unfortunately, there’s no way of changing the quantity unless they go “back” to the cart page. Or back to the product page and add it again. There are some nice 1-page checkout plugins for WooCommerce that kinda combine the cart and checkout pages into one. You might look into those, if you need quantity adjustment on the checkout page.
Hi, it looks beautiful. ?
For some reason, I can’t seem to get the columns to sit next to each other. The right column is below and to the right. Any help would be much appreciated!
https://courses.susanday.me/checkout/
Hi Daniel, with just a quick look, it looks like there’s something “clearing” the spaces to the sides of the columns. So something like this should fix your simplified WooCommerce checkout page:
@media (min-width: 981px) {.woocommerce .col2-set, .woocommerce-page .col2-set {
float: left;
}
#order_review_heading, .woocommerce #order_review, .woocommerce-page #order_review {
clear: none;
}
}
Wow, that did it. Thank u! I’ll share you on Twitter and Facebook :-). I don’t have a big following, but anything to say thx!
Thanks Daniel! Glad it worked. We’d love a review on Facebook.
Hi Tevya,
I just installed the divi plug-in but seems it does not work in my website :/
Here it is: https://inhalation-summit.com/index.php/checkout/
Best,
Diogo
Hi Diogo, do you have the CSS provided, loading on this page? I’m not seeing it with dev tools on your WooCommerce Checkout page. You’ll need to put it in your theme’s custom CSS box or the Divi custom CSS for this page.
Hi,
Thanks Tevya, Great article.
But about Skip the Cart Page function “get_checkout_url” and “add_to_cart_redirect” is deprecated the new function must be like this
add_filter(‘woocommerce_add_to_cart_redirect’, ‘gh_add_to_cart_redirect’);
function gh_add_to_cart_redirect() {
global $woocommerce;
$checkout_url = wc_get_checkout_url();
return $checkout_url;
}
Thanks Mo’men! I’ve updated the post to reflect your updated code.
Excellent work. I really love the look. But it appears you disabled the shipping address and all other fields.
Yes, if you read, we were selling software on that site. So we didn’t need those fields. Just the basic fields required for charging their card and logging their info in our licensing system.
Hi , when I added the code on custom css my Shop Page stop to scroll down when in maximize mode of browser
See my reply to Michael’s comment below. I’ve updated the CSS so it should not affect other WooCommerce pages. Thanks for pointing this out!
** Caution ** THIS CODE WILL BREAK YOUR PRODUCT PAGE
If you add this code to your general custom CSS, it will break your product page!! Took me a long time to figure this out. Tt makes it so users cannot scroll down on your product page.
The culprit is this line:
.woocommerce { overflow: hidden;}
I just deleted that and it worked. Hopefully that didnt break anything on the checkout page.
I recommend fixing this bug before posting publicly!
Hi Michael, you’re right, that probably shouldn’t be used if you’re applying this to your entire site. We were adding it only on the checkout page and so I didn’t think about bigger implications. I’ve added .woocommerce-checkout to that particular style you mentioned, and a number of others in the CSS above. That will make it only apply to the Checkout page. So if you remove what you had before and apply the updated CSS above, it should not break other WooCommerce pages anymore. Thanks for pointing this bug out!
Hi there !
For some reason, if i input the CSS you provided, nothing happens on the checkout page… That’s weird. (I tested with a few css lines and update is taken into account…) WOuld you know what’s happening here ?
Issue fixed. regarding my last question, i found the issue. There is a CSS error displayed. I just removed the block and everything went ok.
Excellent Gus! Glad you got it sorted out.
Hello, I use the xStore theme, and i don’t have the custom css in page settings.. Can you help me please? 😀
I find your checkout beautiful.. !
If you go to Appearance > Customize > Additional CSS (usually at the bottom of the sidebar of the Customizer, you should be able to add custom CSS there. This works for most themes now days.
It doesn’t work for me 🙁 https://ibb.co/GvMQnML
Are you interested in our WP support plans at all? If so, our Boxcar plan includes fixes and enhancements like applying this to work with your theme. Just contact us for more details or signup.
If you’re not interested, we recommend finding a developer on Codeable who can take care of it for you.
Thanks, It works very well. However, the code hides the Shipping Address checkbox.
You probably need to adjust some CSS a bit. Try inspecting in the dev console the shipping address checkbox and adding a margin around it. You may need the dreaded “!important”.
Thank you very much for your great CSS. Helped me a lot