

Creating interactive elements is key to engaging your audience and enhancing their experience. Toggle elements are especially useful for displaying FAQs, allowing users to reveal answers with a click. While ClickFunnels 2.0 lacks a native toggle element, you can still achieve this functionality with some simple steps. In this guide, we will show you how to create a custom toggle element in ClickFunnels 2.0, making your content more dynamic and organized. For additional help with website optimization and customization, visit wpXpress!
Before we proceed, here are the main elements that we are going to use in creating the custom toggle element in ClickFunnels 2.0
- Subheading – This is what we will use as the toggle title
- Paragraph – This is what we will use as the toggle body
- Divider – This is the element that separates one toggle from another
Step-by-Step Guide
Step 1: Preparation
- Make sure that you already have your section and row placed
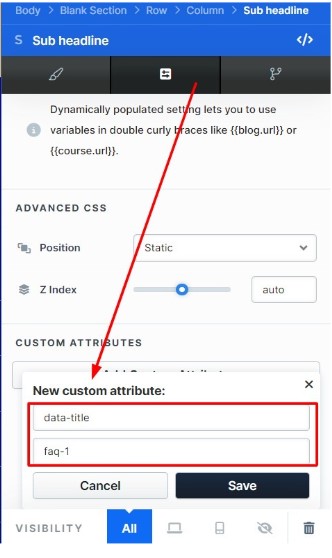
Step 2: Adding and Configuring the Subheading
- Add the first Subheading
- Go to the Subheading’s setting and activate “Icon After” then select the “fas fa-angle-down” icon
- Go to the advanced settings and add a custom attribute: “data-title” with the value “faq-1”
Step 3: Adding CSS Code
- Go to the Settings tab of the funnel page and select “<> Show Code”
- Paste the following CSS code into the {} CSS tab:
/*Toggle Customization*/

[data-title*="faq"] [data-page-element="IconNode"] {
 float: right!important;
   transition: .5s;
 }

.iconRotate {
 transform: rotate(180deg);
   transition: .5s;
 }
What this code does is it calls the subheading’s data-title that has “faq” as part of its value and points to the specific element inside the subheading which in this case is the data-page-element=”IconNode” and puts it to the right-hand side of the subheading element with respect to its padding. We will discuss the second part of this code later. For now, let us proceed to the next step.
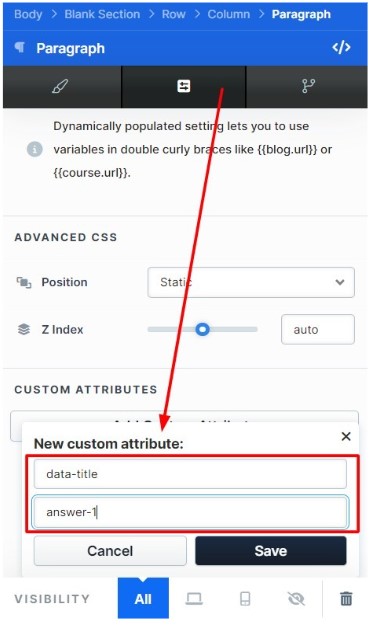
Step 4: Adding the Paragraph Element
- Add the Paragraph element below the Subheading
- Go to its advanced settings and add a custom attribute: “data-title” with the value “answer-1”
Step 5: Adding the Divider Element
- Add a Divider element below the paragraph element
- Style it however you want, and we would suggest for you to keep the padding-top and padding-bottom to 10px so you can select it more easily later
Step 6: Hiding the Paragraph Element
- Go to the paragraph’s settings and set its visibility to “Hide in all devices”
Step 7: Adding JavaScript Code
- Go to the Settings tab, select “<> Show Code”, and go to the </> Footer Code panel
- Paste the following JavaScript code:
<script>
   $('[data-title*="faq"]').click(function() {
   $(this).next('[data-title*="answer"]').slideToggle();
     $('[data-page-element="IconNode"]', this).toggleClass('iconRotate');
   });
 </script>
What this code does is tell the subheading’s data-title with part of its value as faq that when it is clicked, it should show the corresponding data-title with part of its value as answer. This gives the subheading and the paragraph elements the toggle function.
The next part of the code is calling the icon of the subheading element and giving it the class iconRotate to have the icon rotate at 180 degrees when the subheading element is clicked.
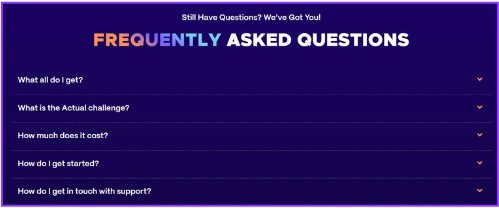
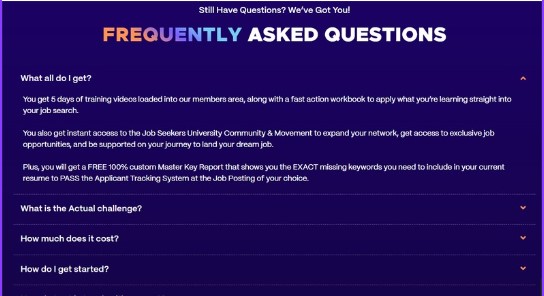
Screenshots
Here are screenshots of how it is supposed to look after you have typed in your toggle title, and body. You can style yours however you want but for reference, here is what we have created for one of our clients:
You can add additional subheadings, paragraphs, and dividers as needed. For subsequent subheadings and paragraphs, ensure the custom attribute values increment accordingly: faq-2, faq-3, faq-4, etc., for subheadings, and answer-2, answer-3, answer-4, etc., for paragraphs.
By following these steps, you can create a custom toggle element in ClickFunnels 2.0, ideal for organizing and displaying FAQs. Experiment with further customizations to make the toggle elements fit seamlessly with your site’s design.
Sources
This tutorial was inspired by a YouTube video on creating toggle elements in ClickFunnels 2.0. For more detailed visual instructions, you can watch the original video here.


0 Comments